Monday, January 24, 2011

Rise Krispie and Peanut Butter Chocolate Balls

By: Jill
Once a year, the people who live across the street from my parent's house make peanut butter chocolate balls for the all the neighbors. Every member of my family would run to the door when they were brought over and descend upon them like we had never seen chocolate before. We would greedily claim every last once over the next few days and give each other a hard time for having more than someone else.

In all my years of baking, I had never actually tried to recreate these delicious treats. When my sister said that she was coming home this past weekend, I knew that I wanted to make something special and found a recipe that incorporated rice krispies for a lighter tasting version of the original with a little bit of a crunch.
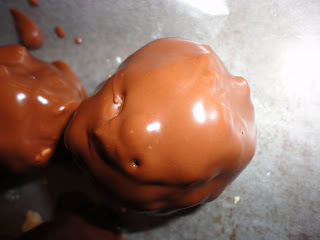

The center is made of rice krispies, butter, peanut butter, and powdered sugar.
The butter and peanut butter are melted on the stove until they become completely liquefied.
Then the dry ingredients are added and stirred.
You form the balls by hand into any size/shape you want.
The chocolate coating is different from regular ganache because it calls for shorting and chocolate in order for the chocolate to set.
Each rice krispie ball is dipped into the melted chocolate and placed on wax paper.
After they set in the fridge, they are ready to go!
These were a huge hit at dinner and with my family. We were able to eat our fill of them without having to fight one another for the last piece!

Monday, January 17, 2011

Happy New Year Cake & Cupcakes!

By: Christine
This order was placed by my Aunt, who needed to bring a yummy dessert to a New Year’s Eve party that she was attending with her family. There was going to be a few other families at the party, approximately 20-25 people. We decided that a small square cake and one dozen cupcakes would be a great idea for this party!
I started by baking the cake, using my favorite chocolate cake recipe, The Pioneer Woman's Best Chocolate Sheet Cake Ever. After allowing the cake to cool, I frosted it with white buttercream frosting.
I used chocolate buttercream frosting to make the border for this cake. I tinted the chocolate frosting black and piped on large round dots along the sides. Then, I added metallic gold, silver and black sprinkles to the top and sides of the cake.
I made chocolate stars out of chocolate candy melts and dunked them in the gold, silver, and black sprinkles and added them to the top of the cake. I wrote on the cake "Happy New Year, 2011" with the black chocolate frosting.
For the cupcakes, I used my favorite yellow cake recipe. Jill and I worked on the cupcakes together and we frosted these cupcakes with both vanilla and chocolate buttercream. We topped the cupcakes with a metallic gold and silver sprinkles and a chocolate star!
This cake and cupcake order was so much fun to make. The metallic sprinkles and the chocolate stars gave the cake and cupcakes a New Year's Eve party look!

Monday, January 10, 2011

Chocolate Guinness Cupcakes with Bailey's Frosting!

When I saw this recipe for mini-cupcakes, it looked too good not to try! My cupcakes have a few variations on this original recipe, but the ingredients are the same. I made them both for Christmas and for a cocktail party hosted by my friend Janice. This cupcake has a chocolate Guinness base covered by chocolate ganache and then topped with Bailey's frosting. I have to admit, it might be one of my new favorites!

The recipe calls for one cup of Guinness (feel free to drink the rest!) which is simmered on the stove with butter.

Cocoa powder is added to the Guinness/butter mixture and brought to a simmer. This smells absolutely divine!

While the stovetop mixture is simmering, the sour cream and eggs are combined in the mixer. Sour cream keeps the cupcake light, fluffy, and moist.

After the chocolate mixture has cooled, it's added to the sour cream and eggs mixture.

The mixture is then folded into the dry ingredients by hand until just combined.

These mini-cupcakes are filled half way, leaving room for the ganache, and baked for 20 minutes.


The bittersweet chocolate ganache topping is cooked over the stove top until smooth.

Then, the ganache is spooned over the entire top of the cupcake.


Bailey's buttercream frosting is absolutely delicious! This frosting must be generously whipped in order to make it smooth.


The result is three layers of amazing flavor! You get a little bit of each flavor in each bite. Because these are mini-cupcakes, you are not overwhelmed by the rich ingredients and can enjoy every delicious bite.

Monday, January 3, 2011

Merry Christmas (Part One)

By: Christine
After making lots of cake pops for Christmas Eve, I decided to make a few different things for Christmas day.
I turned to one of my favorite books, “Hello Cupcake” and found lots of ideas, but was able to pick just one to make: Snow Globe Cupcakes!
I baked one dozen chocolate cupcakes, allowed them to cool, and frosted them with white buttercream. I sprinkled blue sugar crystals on top to resemble the “snow” inside of a snow globe. I made three different snow globe scenes:
Snowman: I used jelly candies as the body and chocolate candy wafers for the hat and eyes. I used an orange jelly candy for the nose and green buttercream frosting for the scarf.

Gingerbread house: I used a graham cracker as the house and piped on the roof & doors with colored buttercream frosting.
Christmas tree: I used green colored buttercream for the tree and a yellow sprinkle for the star. Then I used melted chocolate candy wafers for the stem of the tree.
When each snow globe cupcake scene was complete, I placed them on their side and attached them to a chocolate covered graham cracker using melted chocolate candy. These cupcakes were complete & so cute!
The other things that I made for Christmas day were cookie candy cups in a few assorted flavors; Snickers, mini peanut butter cups & Peppermint Stick
I made sugar cookie dough and double chocolate cookie dough. I rolled the dough into balls and placed them into a mini muffin tin. While these were baking, I unwrapped a few mini Snickers candy bars and a few mini peanut butter cups. As soon as the cookies came out of the oven, I placed the candies into the center. 1/3 of the cookies had Snickers in the middle, 1/3 had PB cups and the other 1/3 I left plain, temporarily.
With the plain cookies, I waited until they were cool and then I piped on white buttercream frosting and placed them upside-down into a bowl of crushed peppermint candies. After all of the cookies cooled, I drizzled on green & red candy melts and also added white sprinkles which completed these cookie candy cups!

Monday, December 27, 2010

Christmas Eve Cake Pops!

By: Christine
I received many requests from family members and friends that I make cake pops for the two Christmas Eve parties that I was going to be attending. I had made some holiday cake pops last year and they were a huge hit. Bakerella has so many ideas for holiday cake pops and after looking around her website I decided to make reindeer cake pops, snowmen cake pops and Christmas tree cake pops.
I started by baking a small yellow butter cake and a small chocolate cake, then I let them cool completely. Using a spatula, I scraped the cakes out of the pans and into two large bowls. I added a half cup of frosting into each bowl (vanilla in the yellow cake and chocolate in the chocolate cake.) After combining the cake and frosting together, I spooned out a small amount of the mixture and rolled it into a ball. I did this step with the remaining cake/frosting mixture until I had all the cake balls I needed.
I decided to work on the snowmen cake pops first. For these cake pops I used the yellow butter cake balls. I placed a lollipop stick into each cake ball and put them into the freezer for a few minutes to harden. While the pops were in the freezer, I melted white chocolate candy wafers. After the cake pops were slightly hardened, I dunked them into the melted white chocolate and tapped the pop until the white chocolate was smoothly covering the cake ball. I stuck the pop into a Styrofoam block to dry.

While the cake pops were drying, I worked on the snowman’s accessories. I made the snowmen hats using a standard sized Oreo cookie and also a mini Oreo cookie that I “glued” together using chocolate candy wafers. I also made the snowmen noses with mini M&M candies.
I attached the hat & nose to the white cake pop and then drew on, with black frosting, the snowman’s eyes and mouth. These cake pops were complete!
The next cake pop I decided to work on was the Christmas tree pop. These ones I had made before they were so fun and festive, I decided to make them again!
I started with a cake ball that I formed into a cone shape. I placed lollipop sticks into the cones and stuck them into the freezer to harden. While they were in the freezer, I melted green candy wafers. I dunked the cone shaped cake pops into the melted green candy, added some “ornaments” (large round candy sprinkles) and a star on top!
The last cake pop may have been the most difficult; the reindeer cake pop. I started out, as I had before, placing a lollipop stick in the cake ball. After hardening in the freezer, I dunked these cake pops into melted milk chocolate.
I used a mini M&M candy for the nose, pretzels for the antlers, white candy melts and black frosting for the eyes and mouth. These cake pops were complete!